I’m in the process of creating DVD videos from Camtasia Videos. I ran into a pretty hefty obstacle, though. My converted DVD’s looked blurry and low-quality. Using the software and settings below, I was able to create a sharp and well-focused DVD that played perfectly in my DVD player and allowed me to read rather fine text on my LCD TV.
The Software I Used
- Camtasia Studio 6 (for capturing the video and creating easy pan and zooms)
- Sony Vegas Pro 8.0c (critical for getting a crisp AVI file)
- Sony DVD Architect 4.5 (critical for creating the crisp, DVD ready folder structure)
Believe it or not, I’m using all the above on Windows 7 (64 bit) successfully.
Export Settings for Camtasia Studio
In my case, I’m using an AVI video that was already created. It’s 640×480 in size. If you’re recording your own Camtasia videos, shoot the originals in 1280 x 720 for 16:9 video according to John’s instructions. This will allow you the maximum potential for leveraging your video in various mediums (YouTube, DVD, BluRay, etc).
Go ahead and edit your video in Camtasia to your liking. You’ll need to use Pan ‘n Zoom quite a bit to show detail on the DVD. Once you’re done editing and saving your project, it’s time to export the video.
- In Camtasia Studio, go to File > Produce Video As…
- Select DVD Ready, then click the drop-down again and select Add/Edit Preset.
- Make sure DVD-Ready is selected on the top drop-down and click Edit right below it.
- Give the Preset a New Name. I used DVD-Ready AVI (NTSC). In hindsight, I should have named it “Sony DVD Architect Ready“.
- Below are the settings I used.
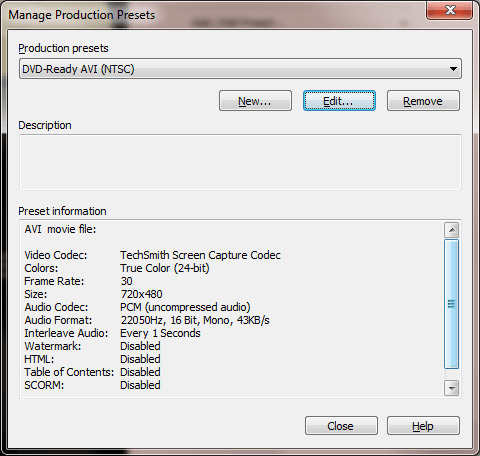
Go ahead and export the file. This could take a while depending on the size of your video. Once it’s done, it’s time to load up Sony Vegas Pro.
How to Create a Crisp, DVD-Ready Video File in Sony Vegas Pro
Ok, we have the AVI file exported out of Camtasia Studio. You’re probably asking, “why don’t I just burn that file”? Firstly, we need to convert the AVI file into a DVD compliant structure.Secondly, most software the converts AVI’s to DVD structures compress the video into blurry, unreadable messes. AVS4You Video Editor, for example, did a terrible job rendering sharp files.
I got the best results using Sony Vegas Pro 8.0c and Sony DVD Architect 4.5. Basically, I’m using Sony Vegas Pro to create a crisp, new AVI file with minor tweaks that will make a huge difference on a DVD. Then I’m creating the DVD folder with Sony DVD Architect.
Here are the steps to Export the Detailed DVD AVI from Sony Vegas Pro:
- Open Sony Vegas Pro. Go to File > Import > Media… and locate the AVI that Camtasia exported.
- Right click the video in the Project Media window and select Properties.
- Change the Pixel Aspect Ratio to 0.9091 (NTSC DV). Click OK.
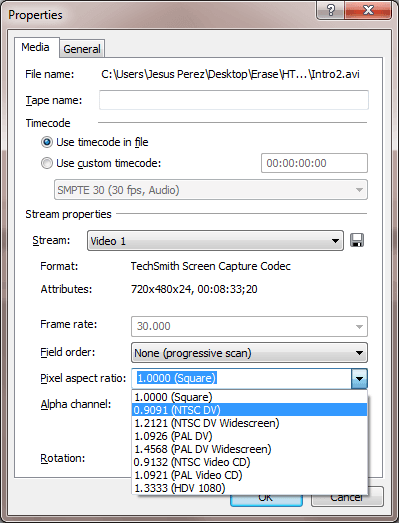
- Drag it into the Main timeline on the bottom.
- Go to File > Render As… and use the settings below:
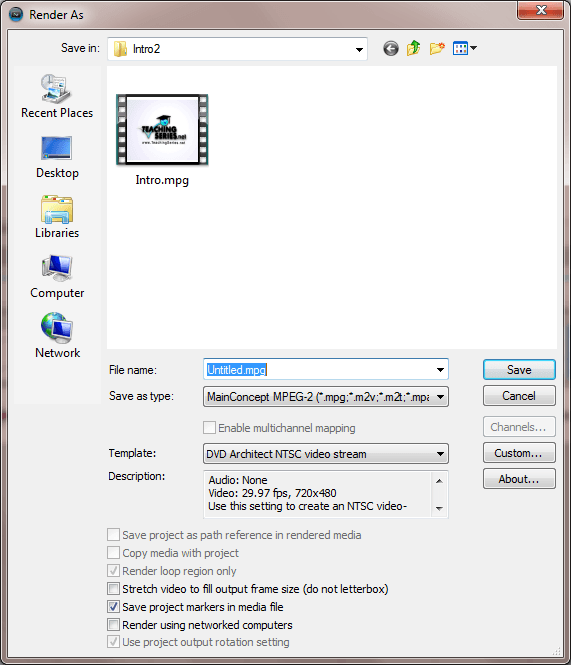
- Then click “Custom…”
- You’ll notice there are Tabs on the bottom of this window. Use the following settings on the tabs indicated below:
- On the Project Tab, select “Best”.
- On the Audio Tab, check “Include Audio Stream”.
- Optionally, type in a new name for the template and press the “Save” icon. This makes it easy to select later.
- Click OK.
- Click Save to Render the MP2 (.mpg) file.
How to Create the DVD File in Sony Architect 4.5
Now you have a DVD Architect Compliant MP2 file that’s ready for DVD folder creation. If you didn’t do the step above, DVD Architect would insist on re-compressing the video file again to make it DVD compliant. By using the settings above, DVD architect will simply create the necessary DVD folders and “package everything up” for a Burning program like Nero, AVS Disc Creator, etc.
- Open Sony DVD Architect.
- On the bottom left panel there’s a tab called Explorer. Click it and find the previously created AVI file.
- Once you find the file, it will appear in the right window. Right click it and select Insert Media.
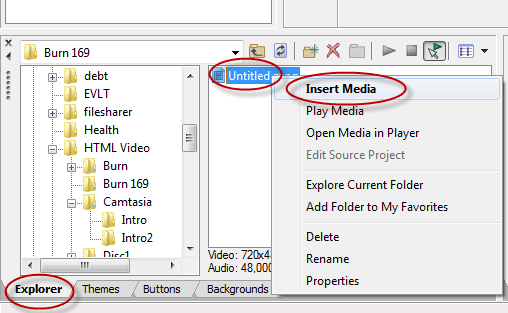
- It will be added to your DVD Menu.
- Now go to File > Make DVD.
- Click Prepare and in the next window, find a folder to save the DVD folder to. Click Next.
- You should only see 1 Warning message about Audio being compressed. If you see a warning about video being compressed, you messed up somewhere.
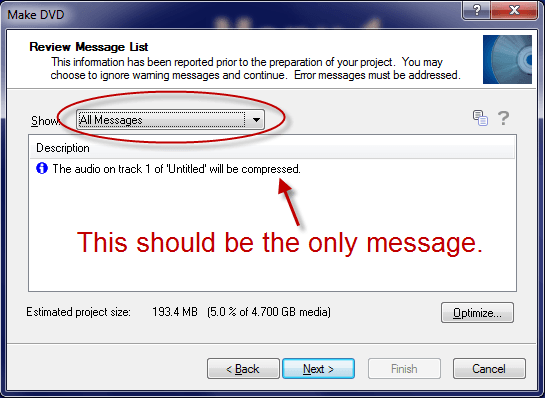
- Click Next. There should be “No Messages to Display” again.
- Click Finish to create the DVD Folder. Warning: this will create an UGLY DVD disc menu. Creating pretty menus is outside the scope of this article.
Burn Your DVD
For the last step, you simply need to burn your DVD folder to a DVD. You can use Nero, AVS4You Disc Creator, CDBurnerXP or whatever else you wish. However, make sure you burn it as slow as possible to be sure it will play on all DVD players. Car DVD’s are especially sensitive and need to be burned at a max of 4x.
That’s it, enjoy your new, crisp DVD on your TV.
P.S. There’s also a really good course on converting Camtasia to DVD by John Rofrano. It goes into much greater detail.
